Safety Warnings
Keep this product away from water, fire, humidity, or hot environments.
Use only the power supply and accessories approved by the manufacturer, which can be found in the original packaging of this product.
We cannot guarantee that no accidents or damage will occur due to the improper use of the device. Please use this product with care and operate at your own risk!
Quickstart
- Use a Phillips head screwdriver to loosen the screw, which secures the bottom lid (see Bottom Lid).
- Insert the SIM card into the slot with the chip facing up and the cut-out corner toward the right side (If device was purchased with a SIM card this will be inserted already).
- Choose your powering solution, please see the Powering section for possibilities.
- Connect your computer to the LAN port (Can be Ethernet port 1 or 2).
- The default Wireless SSID is ‘SimRush-xxxxxx’. The wireless password is the hardware serial number e.g. AABBCC112233. (You will find the serial number on the box or back of the controller, the password will be all characters before the ‘/123’.
- To make changes to the LAN address or Wireless settings (such as personalising your wireless SSID) please visit NetPanel: https://netpanel.app/
- Use the following steps to access the SimRush Omni unit to make changes to APN settings or check SIM/carrier status information:
- Ensure you are connected to the SimRush unit via ethernet or WiFi
- Using a browser, browse to http://192.168.10.1/
- Login details are, Username: installer , Password: blank (there is no password set)
- Once you have logged in, the main status page will show you the current carrier/APN information along with signal information
- To change the APN you need to click ‘Interfaces’ in the top left corner
- Then click ‘lte1’ under the name column and the page will refresh again
- Under the general section, click on the dropdown for ‘APN Profile’ – by defult this will be set to EE, click the down arrow ‘V’ which will list other carriers
- Select the desired carrier, then click ‘Apply/OK’ at the top of the page.
Powering
The device accepts power from the power jack or from the Ethernet port:
- Direct-input power jack (5.5 mm outside and 2 mm inside, female, pin positive plug) accepts 12-57 V ⎓ DC;
- Ethernet port accepts 802.3af/at PoE 18-57 V ⎓ DC.
The power consumption under maximum load can reach 16 W. Please attach ground (earth) wire to the screw under the bottom lid.
Connecting to a PoE Adapter:
- Connect the Ethernet cable from the device to the PoE+DATA port (far-left port) of the PoE adapter.
- Connect an Ethernet cable from your local network (LAN) to the PoE adapter.
- Connect the power cord to the adapter, and then plug the power cord into a power outlet.
Mounting
The device can be mounted in several ways: pole, wall, ceiling
The IP rating scale for this device is IP54. When mounting outdoors, please ensure that any cable openings are directed downwards. We recommend using the POE injector and proper grounding with Cat6 shielded cable. When using and installing this device please pay attention to the Maximum Permissible Exposure (MPE) safety distance with a minimum of 35 cm between the radiator and your body.
Mounting on the mast or pole: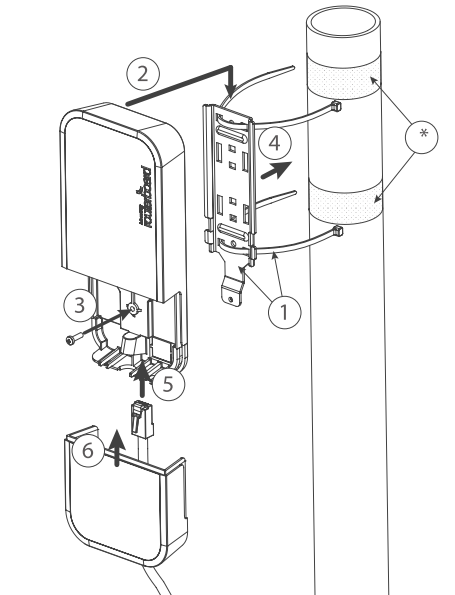
* It’s recommended to use electrical tape to increase friction between materials.
- Mount plastic tie straps to steel brackets guiding them through holes.
- Mount bracket to the device.
- Secure them with a screw.
- Mount and align the device on the pole or mast.
- Guide Ethernet cable through the opening and connect to the Ethernet port.
- Close bottom latch and secure with a screw.
It’s recommended to secure Ethernet cable to the pole using zip ties. With the distance from the device approximately 30 cm.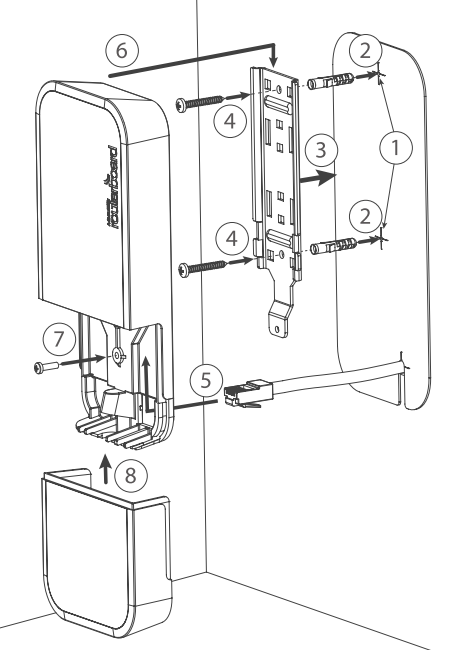
Mounting unit on the wall:
- Use included template to mark spots for drilling holes. And if needed for Ethernet cable. Align accordingly, it will depend on how the device will be mounted finally.
- Insert dowels if needed, depends on wall structure and material.
- Place included a steel bracket on the wall.
- Use screws to secure it in place.
- Extend your Ethernet cable through the opening and connect to the Ethernet port.
- Mount the device on the steel bracket
- Secure it in place with the screw.
- Close bottom latch.
Avoid mounting the device on the low ground spot, as you won’t be able to attach and close the bottom latch.
Mounting on the ceiling: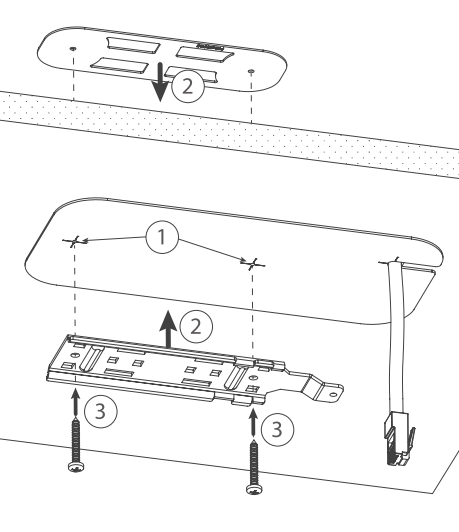
A Special bracket is included in the package to mount on the drop ceiling. As it consists of two parts, to be attached on both sides of the ceiling tile.
- Use the template to mark spots for holes.
- Place both mounting brackets on the spot.
- Secure them together using screws.
Continue assembling in the same manner if mounting on the wall.
- Extend your Ethernet cable through the opening and connect to the Ethernet port.
- Mount the device on the steel bracket.
- Secure it in place with the screw.
- Close bottom latch.
Bottom Lid
- The bottom lid is secured in place with the captive screw.
- Use the Philips PH2 screwdriver to unscrew it, but do not remove the screw completely.
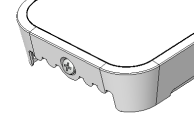
- Pull the cover in the opposite direction from the device to remove it.
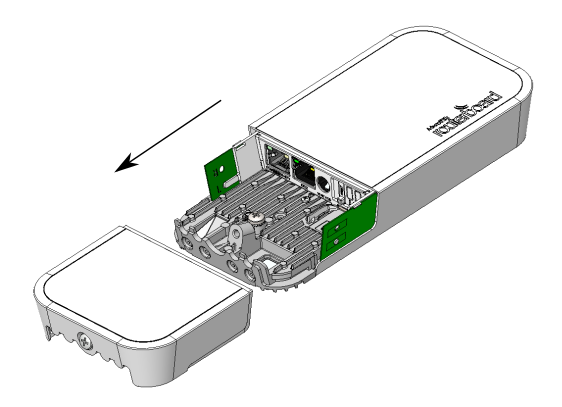
- Reassemble.
SIM slot usage
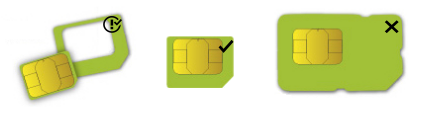
SIM card slot is designed to use with Micro SIM cards.
Nano SIM cards have different thickness, usage with adapter are not recommended.
Reset Button
The reset button has three functions:
- Hold this button during boot time until the LED light starts flashing, release the button to reset RouterOS configuration (total 5 seconds).
- Keep holding for 5 more seconds, LED turns solid, release now to turn on CAP mode. The device will now look for a CAPsMAN server (total 10 seconds).
- Or Keep holding the button for 5 more seconds until LED turns off, then release it to make the RouterBOARD look for Netinstall servers (total 15 seconds).
Configuration
We recommend subscribing to the SimRush Licence to ensure you always receive the latest hardware firmware updates for your device.
